Make Your own Virtual DJ Skin Link at the Bottom Guide Line Deck Type: By default (with the excpeption of Browser and VDJ Logo), elements w...
Make Your own Virtual DJ Skin
Link at the Bottom
Guide Line
Deck Type: By default (with the excpeption of Browser and VDJ Logo), elements will be assigned to Deck Type, meaning that it will automaticaly add 2 identical elements, one for Left Deck and another for Right Deck. A Deck type element allows you to move and resize only the Left deck one. The Right deck element will automatically get the same size and will be positioned automatically based on the Group Mirror/Clone type selection.
If you want to create an element that will be offered for the Master Deck (such as Video Transitions, Master Video preview, Master FXs etc), set the type to "Master"
If you want the element to apply to the default deck (e.g. for a Video skin you want to display the title/artist of the paying track), set it to "None"

Group type: Each element is added to the default Group, and by default its set as Mirror. This means that Right Deck elements (for Deck type) will be automatically positioned on screen, so that at the end you will get a mirrored- look skin. If you intend to create a Clone-look skin, you can still change the type of the Group to Clone from the mid-top section.
In most of the cases, you will want to create a mirror skin but some sections to be cloned, similar to the default skins of VirtualDJ, where the Play/Cue/Stop/Sync section is mirrored (for the skin), but clone inside the section. In this case, leave the default Group set to Mirror, then assign the elements of a section to another Group and set that to Clone.
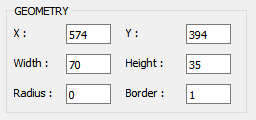
Geometry: This section holds geometry information, such as the X,Y coordinates (position) in side the skin, the width and height of the element, along with some additional ones depending on the element type, such as the Radius, Border size, angle of a knob etc.
The values can be edited in order to place and resize an element ,and will also reflect your movements and resizes with mouse.

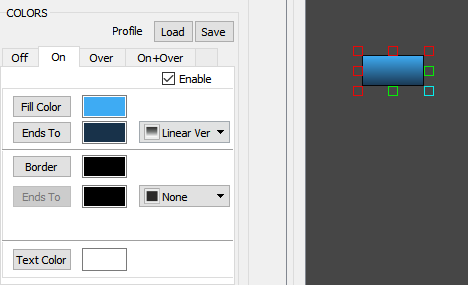
Colors: This section offers the ability to change the colors of a skin element, such as the Background color, Border color, the fill oa knob, the ring of a jogwheel etc. In most cases, there will be tabs to offer all the available colors you may need to adjust to make your elements look the way you want them.

You can choose a single color (Gradient type to None, Linear or Radial (for the ones that make sense). Note that you can also create semi-transparent elements, by setting the Alpha Value in the Color Dialog.
Text: Some elements (such as buttons, textzones etc), offer a Text section to add Text and choose the Font and size. The color of the Text is offered in the Colors section
Note : The Text will be ignored if an action is filled in the Action field. In most cases you will need one or the other. E.g. for a loop button, you want to have an action for the text (get_loop), while for a PFL button, you will need just a "PFL" Text.
Actions: Here is where you enter a valid VDJ script action, in other words what the skin element will do in the skin. In most of the elements, this will be the "Click" action, while others may have different names such as "source" etc. Right-click, double-click actions are also available for some.
Visibility is of course optional and in most cases you will need to enter a vallid action that returns true/false, to determine if your element will be visible under some conditions. E.g. you may want a skin element to be offered when Automix is enabled, so visibility field will have to have the action automix
The ? small button opens an Editor similar to the VDJ one but not working the same (will get there)

Note: If you have several elements with the same visibility (conditions), makes sense to put them in a Panel with the same visibility instead of adding the same in all elements (will write about Panels later)
Icon: Buttons can have icons instead of Text (will add the ability to have both and position). Enable the option and click Select to choose one of the available ones. If you want to add your custom ones, make sure they are in Black&White format (same as the ones you will see in the Icons folder)
Adjust its %size, choose their colors when button if Off/On/MouseOver/On&MouseOver
Credits
djdad
djdad
Country: GR


COMMENTS